Last updated: September 10, 2026
Key Takeaways
- Run normal household flows over 24 to 48 hours while watching for surfacing, odor, or slow drainage.
- The process may end with a $400 D-box correction or a $12,000+ replacement.
- I would not treat a drain field problem as a landscaping issue; if symptoms point to a drain field repair issue, call a septic professional and check local guidance before digging. EPA septic systems.
- After rain is the clue? Think saturation, poor drainage, or groundwater intrusion if backups show up mainly then.
A failing drain field usually comes down to one of three problems: the soil around the trenches is clogged, the pipes or distribution box are damaged, or the field was undersized for the house and soil from the start. The fix might be minor, partial, or a full replacement, and the cost spread is wide enough that guessing gets expensive fast. This drain field repair options & costs — complete guide focuses on the most common repair paths and the costs that usually go with them.
What a drain field problem usually means

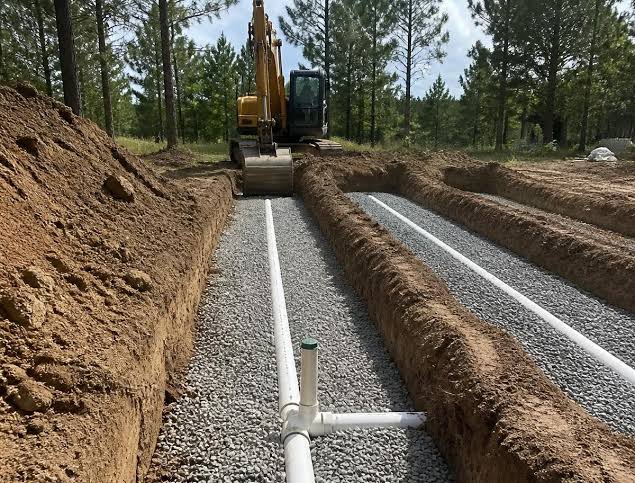
A drain field problem usually means the septic system is no longer dispersing effluent at the rate the soil can accept it. I’m using “effluent” in the septic sense: liquid leaving the septic tank after solids have settled. The “drain field” is also called a leach field or absorption field, and it is the buried area of perforated pipe and gravel, or chamber units, that lets that liquid soak into the soil.
This article applies to homeowners with a conventional septic system and a drain field that is showing symptoms such as slow drains, wet ground, sewage odor, spongy grass, or backing up after normal use. It assumes you already know where your septic tank is, can describe the layout of the field, and have had the tank pumped in the last few years. Not sure whether you have a conventional gravity system, an alternative treatment unit, or a mound system? Consult a licensed septic professional and identify the system before you start pricing repairs. A mound, pressure-dosed field, or aerobic treatment setup changes the repair path and can change the cost by thousands of dollars. EPA types of septic systems.
The cheapest fix is not always the right one. Sometimes it is a trap. A clogged distribution box can cost a few hundred dollars to access and reset; a biologically smeared field may need resting, jetting, or a new reserve area; a crushed or saturated field can force a replacement that runs into the five figures. If the field is surfacing sewage or the tank is backing up into the house, that is a stop-now problem, not a wait-and-see problem. Heavy use, roof runoff, driving over the field, and tree roots all make the wrong repair fail again.
I would not treat a drain field problem as a landscaping issue. It is a wastewater disposal problem with public health consequences if handled badly. So the first question is not “How do I patch it?” but “What failed, and how much of the system is still usable?”
How do I tell if the drain field is actually failing?
Look for a pattern, not a single puddle. And separate tank trouble from field trouble first. A septic tank full of sludge can mimic a bad field, and a clogged outlet filter can do the same. The field is more likely the problem when the tank has been pumped, the filter is clear, and the symptoms keep returning after 24 to 72 hours of normal use.
The signs that point to the drain field include: sewage odor over the field, wet or greener grass in a strip that follows the trenches, slow drains throughout the house after rain, gurgling fixtures, or wastewater surfacing in low spots. If the soil stays soggy even during dry weather, the field may be saturated, compacted, or receiving too much water from the house or surface runoff. A drain field that “sort of works” often fails first under laundry loads, long showers, or when guests are in the house.
Before assuming the field is dead, I would check the basics. Have the tank pumped if it is overdue. Inspect the outlet baffle or outlet filter. Make sure downspouts, sump pumps, and grading are not sending water into the field area. Some failures are really hydraulic overload, which means the soil cannot absorb the volume, not that the pipes are broken. A field submerged by groundwater after storms may still recover when the water table drops, while a field damaged by years of grease and solids may not.
One useful clue is timing. If backups happen mainly after rain, think saturation, poor drainage, or groundwater intrusion. If they happen after heavy indoor use, think undersized field, clogged biomat, or a distribution problem. The biomat is the slimy biological layer that forms naturally at the soil interface; it helps treatment, but when it gets too thick it slows absorption. A generic article often treats every wet spot as a field replacement. That is lazy and costly. Better to identify the failure mode first, because repair options depend on it.
For pricing, local access matters. If the field is shallow, near a driveway, or under mature trees, excavation costs go up because the crew needs more care and more restoration. In rural areas, travel and equipment mobilization can also move the price materially. That part surprises people.
Drain field repair options, from smallest fix to full replacement

The right repair option depends on whether the problem is a component, a section of field, or the entire absorption area. I would think of the options in layers: fix the easy mechanical failures first, then try recovery measures, then replace only the part that truly cannot be saved.
The least invasive repairs are these:
- Distribution box repair or replacement. A distribution box, or D-box, splits flow to multiple lines. If it is tipped, cracked, or clogged, one side of the field can be overloaded while another stays dry. Realigning or replacing it often costs a few hundred dollars to around a low four-figure amount, depending on excavation depth and access.
- Pipe or riser repair. Broken inlet piping, crushed laterals, or damaged access risers can be repaired if the failure is localized. This is a targeted fix when the rest of the field still percolates.
- Outlet filter cleaning and tank pumping. This is not a field repair by itself, but it is often the first step before anything more expensive. If the field was getting solids, cleaning the filter and pumping the tank may buy time. If symptoms vanish for months, the problem was likely upstream.
The middle tier is field recovery:
- Resting or alternating the field. If you have a reserve area or alternating trenches, the system can sometimes be switched and the wet side rested for months so the soil can dry and rebound. This works better when the field is not structurally damaged.
- Hydro-jetting or pipe cleaning. This clears some blockage inside the lateral lines, but it will not fix a saturated soil bed or a failed biomat. It is a narrow fix, not a cure-all.
- Soil rehabilitation or aeration. Some contractors offer biological or mechanical restoration methods. I would be cautious here and would ask a septic professional what failure mode the method can actually address. These can help in limited cases, but they are not substitutes for a failed dispersal area with crushed lines or hydrologic overload.
The major repairs are these:
- Partial drain field replacement. If one section is damaged and the rest still works, replacing only the failing trench group can be the most cost-effective choice. This is common when one branch was overloaded, root-damaged, or crushed by a vehicle.
- Full drain field replacement. If the whole area is saturated, undersized, or too old to trust, replacement is the durable fix. Costs can move from the high four figures into the low or mid five figures depending on size, soil, and permit requirements.
- System upgrade. Some sites cannot support a like-for-like replacement. You may need a mound system, pressure distribution, or another engineered option. That is a bigger project, but it is sometimes the only compliant path when soil percolation is poor or the lot is constrained.
I would not pay for repeated “repairs” to a field that is clearly undersized for the house. A line flushed, a trench aerated, and a D-box shimmed can all be valid; none of them fix the wrong design. If the house has grown, bedrooms have been added, or water use has changed, the original field may simply be outmatched.
What drain field repair costs, and what changes the price?
Drain field repair costs range from a few hundred dollars for a simple component fix to well over $10,000 for a replacement, with local conditions driving most of the variation. That range is honest but not a quote. The repair type is only one piece; the real price comes from access, excavation depth, permit work, soil conditions, and whether the fix is a patch or a rebuild.
A small distribution box repair is often among the cheaper calls because the crew may only need limited digging. A lateral line repair gets more expensive if the line is deep, root-filled, or located under a mature tree canopy or patio. Partial replacement is usually priced by the section replaced, but the mobilization cost can make a small job feel proportionally expensive. Full replacement adds design, permits, inspections, excavation, new gravel or chamber units, piping, backfill, and yard restoration. If heavy equipment can’t reach the field directly, the labor bill rises quickly.
Several factors change the price in ways generic articles usually skip:
- Soil type and percolation. Tight clay or high groundwater can force an engineered solution instead of a basic trench repair. “Perc” refers to percolation, the rate at which water moves through soil. Slow percolation means less room for error and usually more cost.
- Field size. More bedrooms, higher daily water use, and larger design flows require more absorption area. A larger field means more materials and more excavation.
- Accessibility. A field under landscaping, a fence, a driveway edge, or shallow bedrock takes more careful digging and restoration.
- Permit and inspection requirements. Many jurisdictions require permits for any significant septic work. The permit itself is rarely the biggest line item, but it adds process and can lengthen the timeline.
- Age and code requirements. In some places, once you open up a failing field, you may be required to bring parts of the system up to current code. That can include reserve area requirements or setbacks from wells, property lines, and waterways.
I would be skeptical of any contractor who quotes a full replacement sight-unseen without asking about soil tests, tank size, number of bedrooms, or field layout. A price without those details is often a placeholder, not a plan. The opposite mistake is assuming a small repair is always enough because it is cheaper. If a field has been ponding for years, paying for a short-term fix can become wasted money.
One practical way to think about value: the “best” repair is the one that restores reliable drainage for the longest time at the lowest total cost, not the one with the lowest invoice today. Sometimes that means a higher upfront bill for a partial replacement instead of a string of cheap fixes.
Drain field repair steps: what a competent repair process looks like
A competent repair process starts with diagnosis, not excavation, and ends with confirming that the field drains without surfacing or backing up. I would expect at least seven clear steps, because skipping any one of them is how people rebuild the wrong section or miss the real problem.
- Locate and map the system. Mark the tank, distribution box, field lines, and any reserve area with stakes or flags before digging. Verify the field layout against the house blueprint or prior septic sketch if one exists. A problem here is discovering a buried line only after a backhoe cuts it.
- Pump the septic tank and inspect the outlet side. Remove sludge and scum, then check the outlet baffle or filter for blockage. Verify that liquid leaves the tank normally after pumping. A problem here is a clogged filter that keeps reloading the field with solids.
- Expose the distribution box and key junctions. Dig carefully to the D-box and any accessible line connections. Verify that the box is level and that flow is equal to each outlet. A tilted box or one filled with solids points to an overloaded branch, not necessarily a dead field.
- Check the field for uneven saturation. Probe or open test points in multiple trenches, looking for standing liquid, collapsed pipe, or root intrusion. Verify whether one line, one side, or the entire field is failing. A problem here is treating a single bad trench as a full replacement.
- Decide whether the soil can recover. If the field is biologically smeared but structurally intact, switch the load to a reserve area or alternate trenches and rest the wet area for weeks or months. Verify that the house has enough wastewater capacity to use the alternate zone safely. A problem here is resting a field that has broken pipe or saturated groundwater conditions without fixing the cause.
- Repair localized damage. Replace cracked pipe, reset a damaged D-box, or reconstruct a crushed section using code-approved materials and bedding. Verify slope, continuity, and distribution before backfilling. A problem here is leaving low spots that trap solids or create ponding in the line.
- Restore the absorption area or replace the field section. Install new trenches, chambers, or engineered components to the depth and spacing required by local code. Verify the trench grade, inlet level, and backfill depth. A problem here is compacting the soil bed too much, which reduces infiltration.
- Test the system under controlled use. Run normal household flows over 24 to 48 hours while watching for surfacing, odor, or slow drainage. Verify that the repaired zone stays dry at the surface and the house drains normally. A problem here is declaring success before the soil has had time to show whether it can absorb the load.
Two numbers matter during repair: trench depth and separation from groundwater or bedrock. Exact minimums vary by local code and soil report, so I would not treat any universal figure as safe without verification. The repair also needs to match the system type. A gravity trench, a pressure manifold, and a mound each need different slope, dosing, and inspection methods.
This is the section where a generic article often goes vague. It says “fix the drain field” as if that were one action. It is not. The process may end with a $400 D-box correction or a $12,000+ replacement. The difference comes from the diagnostic steps, not from optimism.
When should you stop repairing and replace the field?
You should stop patching and move to replacement when the field has structural damage, systemic saturation, or repeated failures that return after short-term fixes. That is the point where more money buys delay, not durability.
Standing sewage on the surface: This means the soil can no longer accept effluent at a safe rate — stop using the affected fixtures as much as possible and get the system evaluated for replacement or major reconstruction.
Collapsed, crushed, or broken lateral piping over a broad area: This means the distribution network itself has failed — replace the damaged section, and if damage is widespread, plan for full-field replacement.
Persistent backup after the tank has been pumped and the filter cleaned: This means the problem is downstream of the tank — do not keep paying for tank service alone; move to field diagnosis and likely repair or replacement.
High groundwater or seasonal saturation that returns every year: This means the site conditions are the limiting factor — use an engineered solution, such as a mound or pressure-dosed system, if local code allows it.
Field age combined with unknown layout or no reserve area: This means you may be one failure away from a total outage — replacement is often the more honest spend than repeated emergency calls.
Repeated partial repairs within a short span, such as the same branch failing twice in 12 to 24 months: This means the field is no longer distributing evenly — stop trying to nurse it with spot fixes and plan a larger rebuild.
I would also stop and change course if the site has a shallow water table, limiting setbacks from a well, or a lot size that cannot support a standard replacement. In those cases, the issue is not “How do I fix this field?” but “What replacement system is allowed here?” That may require a different design entirely.
A common mistake is to think replacement is only for catastrophic failure. It is not. Sometimes replacement is the most cost-effective option once you count repeated pumping, repeat excavation, lost landscaping, and the risk of sewage backup into the house. A field that fails every wet season has already become a budget leak.
Common mistakes that make the bill higher
The most expensive drain field repairs usually come from trying to save money in the wrong place, and the pattern is predictable. I would watch for five errors in particular.
-
Ignoring the tank and filter first. If the septic tank is overloaded with sludge, solids will keep reaching the field. The consequence is accelerated biomat growth and premature field failure. The proper move is to pump the tank and inspect the outlet filter before digging.
-
Driving over the drain field. A field compacted by vehicles or heavy equipment loses pore space in the soil and can crush shallow piping. The consequence is reduced absorption and broken laterals. The proper move is to keep loads off the area and use tracked or lighter access methods if work is necessary.
-
Fixing only the symptom, not the cause. Replacing a wet patch of pipe without addressing a tilted D-box, poor grading, or roof runoff sends the problem right back. The consequence is repeat failure within months or a few seasons. The proper move is to diagnose the hydraulic cause before opening the ground.
-
Using too much water during recovery. Running laundry, long showers, or a full houseguest schedule while the field is resting can ruin a repair. The consequence is that the soil never has time to dry and rebound. The proper move is to reduce water use for the recovery period and follow the contractor’s loading limits.
-
Trusting any “field rejuvenation” promise. Some treatment claims sound impressive but cannot resurrect a field with broken pipe, saturated groundwater, or undersized design. The consequence is wasted money and delayed replacement. The proper move is to ask what exact failure mode